This is the first post in a series I'm calling the practitioner journey. It may yet be some time before I have a user-friendly system ready for anyone to deploy. This raises a challenge of legitimacy: if I'm making claims about what is easy or possible, and all I'm able to show is an underwhelming mostly-text blog, how is a critical observer supposed to evaluate those claims? This series offers a meet in the middle approach. I'm going to publish a series of complete exercises, assuming no prior experience with programming or internet systems. Each exercise will introduce a capability and offer a result. The capability is a skill or technique required to be an effective practitioner[1]. The result will be one of the building blocks of an eventual complete system and, in most cases, something that you can use right away if you want to. With each exercise, we'll build a little bit more of the system together. One cool thing about this effort, if it works, is that not only will we all end up with functioning non-corporate publishing platforms, by building them together, we can enable them to talk to each other using IndieWeb protocols.
Today we're going to start at the beginning--we're going to set up a development environment and use it to get a static site working. I'm going to use AWS in this example and probably most of the examples to come[2]. This post will cover setting up an AWS account and using a cloud development environment to create a minimal static web site. The capability that this exercise unlocks will be the ability to run terraform to create and manage infrastructure. The result of this exercise will be a static website using handwritten HTML--the most basic type of website there is. Together, these two things represent a foundation on which we will be able to build anything. Let's jump in.
Make an AWS Account
Requires:
- Email Address / Street Address / Phone number (that can receive texts) / Name
- Credit Card (the approximate cost of this exercise is under $0.10[3])
- Web Browser (preferably not a public computer)
Results:
- You have an AWS account
Time: 3-7 minutes
To save time, and prevent these instructions from becoming outdated, I'm not going to document the standard AWS account creation process. If you are the type of person who likes to read the instructions, AWS has some here, but my advice is to just jump into creating your account. It’s simple. Once your account is set up, you can set up MFA by signing onto the management console and selecting the security configuration option from your account menu.
Make an S3 Bucket to store Terraform state
Using the cloud efficiently means making a whole bunch of tiny little services work well together. If we tried to use the UI to set these things up, we'd be here all week. Instead, we're going to use terraform. Terraform is a program that lets you describe what you want to make and then sets it up for you. Whenever terraform runs, it saves a record of what it did. If you run it a second time, instead of making all new stuff, it will just check to make sure that the things it already made are still there. If so, it tells you that no changes are needed. When you're done with your infrastructure, you can tell terraform to delete it, and it will remember what to delete.
The data that terraform saves is a critical part of this infrastructure, so we want to make sure that it's protected carefully. To do this, we're going to use S3--AWS's object-storage system. S3 allows you to save files in "buckets." These files are extremely well backed up.
Requires:
- AWS Account
Results:
- A bucket for storing terraform state.
Time: less than 1 minute.
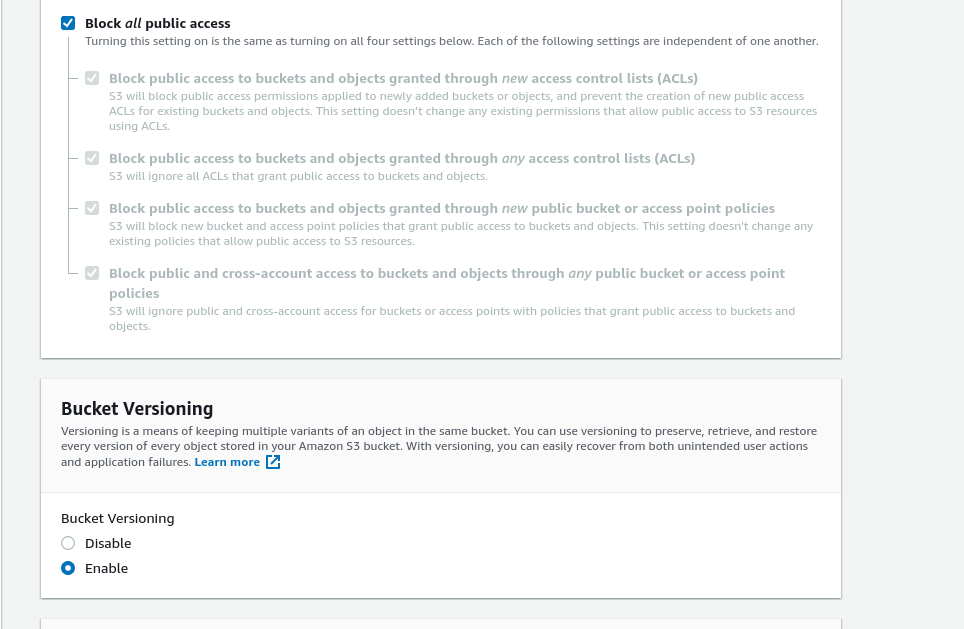
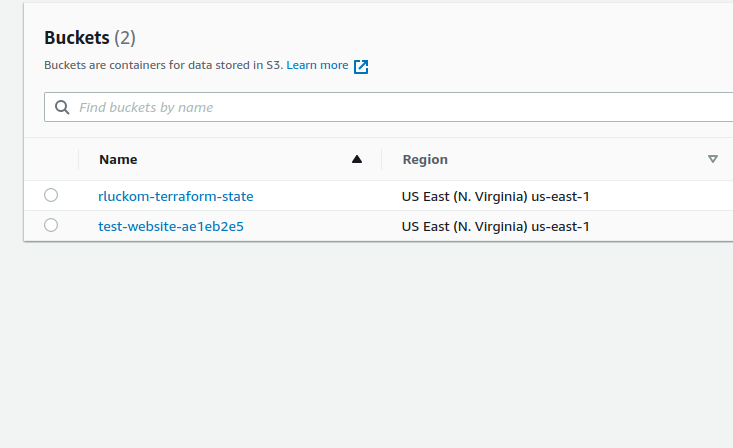
Navigate to the create bucket page. Bucket names
have to be unique--like Twitter handles, two people can't both have the same bucket name, even in different accounts.
One common practice is to use some kind of personal prefix with your bucket names--for instance, I use rluckom, and name
my buckets things like rluckom-logging, rluckom-terraform-state, etc. Choose a name for your terraform state bucket,
and at the bottom of the form, select the circle to enable object versioning. You don't need to change any of the other options[4].
Use the "Create bucket" button to create the bucket.
Make an Administrator Server Role
In this step, we're going to create an administrator-level access role within our account. We'll use it In the next step after this one, when we start a virtual machine[5] (VM) on which to run terraform. Because we're going to want terraform to create infrastructure on our behalf, we need to give it administrator access to our account. This is a pretty big deal, so we're going to follow some security precautions around this role:
- We will create a role that can only be given to a VM. This means that we don't need to download any kind of password or login credentials to the computer whose browser we're using.
- We're not going to create credentials that let us log in to the machine from the internet. That means that we can connect to it through the AWS website while we are logged in, but there is no other way to log in to the computer.
- As soon as we are done running terraform to create the infrastructure we want, we will permanently destroy the VM. We can make a new one with the same role if we want to re-run terraform later[6].
Results:
- An administrator role that we can give to a VM when we want to use terraform to set stuff up
Time: less than 1 minute
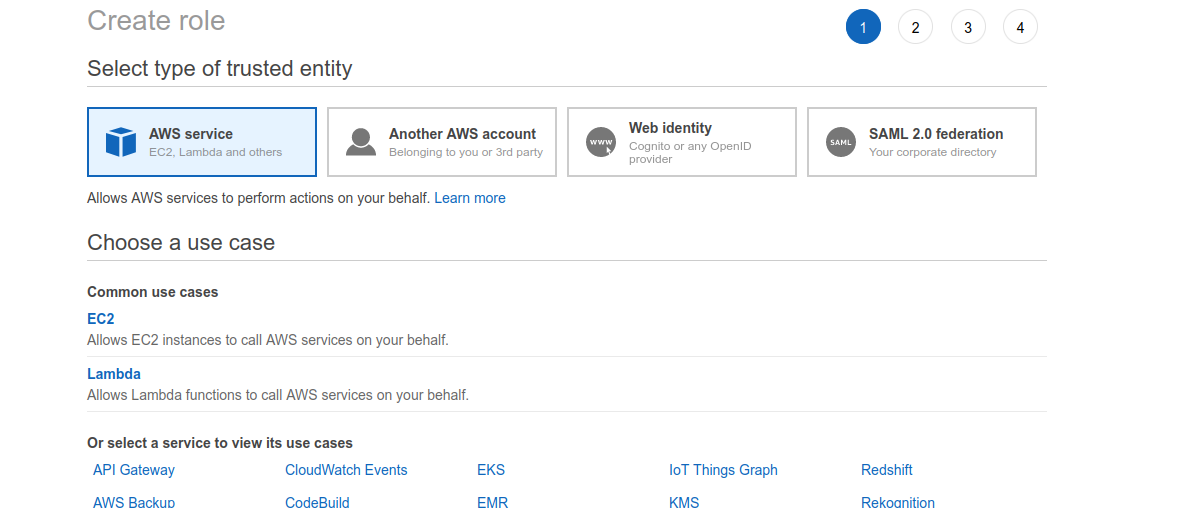
Navigate to the identity and access management (IAM) page in the AWS console. This page is where you can see the permissions you've given out. Note that there are zero users, groups, customer-managed policies, and two roles. We're going to make another role.
On the roles page, click Create Role. On the following page, click on EC2 and then click the Next button at the bottom of the page.
Select the Administrator Access policy. Make sure you click inside the checkbox to select the policy; it isn't enough to just click on the row.
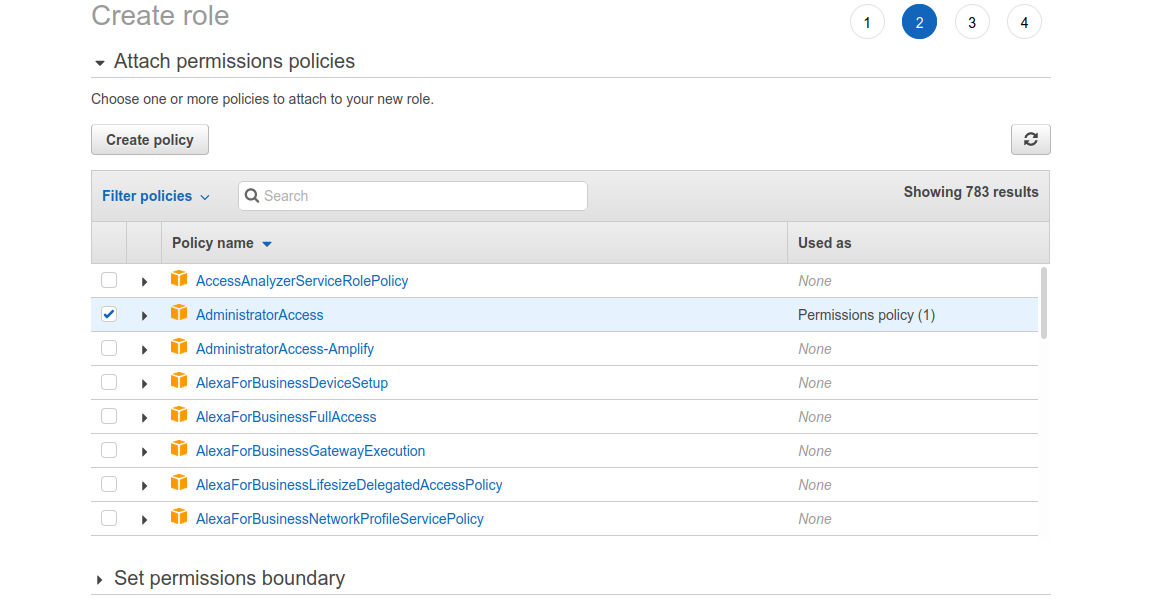
Click through the Tags page--there's no reason to add any now--and on the next screen give the role
a descriptive name like ec2-admin-role. Click the "Create role" button to create the role.
Start A VM and Log In
Now we're going to create the VM. The UI around this is ugly, but there are only two settings we need to worry about.
Requires:
- AWS Account
- An admin role
Results:
- A VM on which we can install terraform.
Time: 3-5 minutes
Go to the instances page and click the Launch Instances button. On the next screen we're going to choose the amazon machine image (AMI) that we want to use. A machine image is like a snapshot of a particular type of operating system, like MacOs, Linux, or Windows. Scroll down until you see an image called "Ubuntu Server 20.04 LTS." Click "Select," leaving the radio button set to "64-bit(x86)"
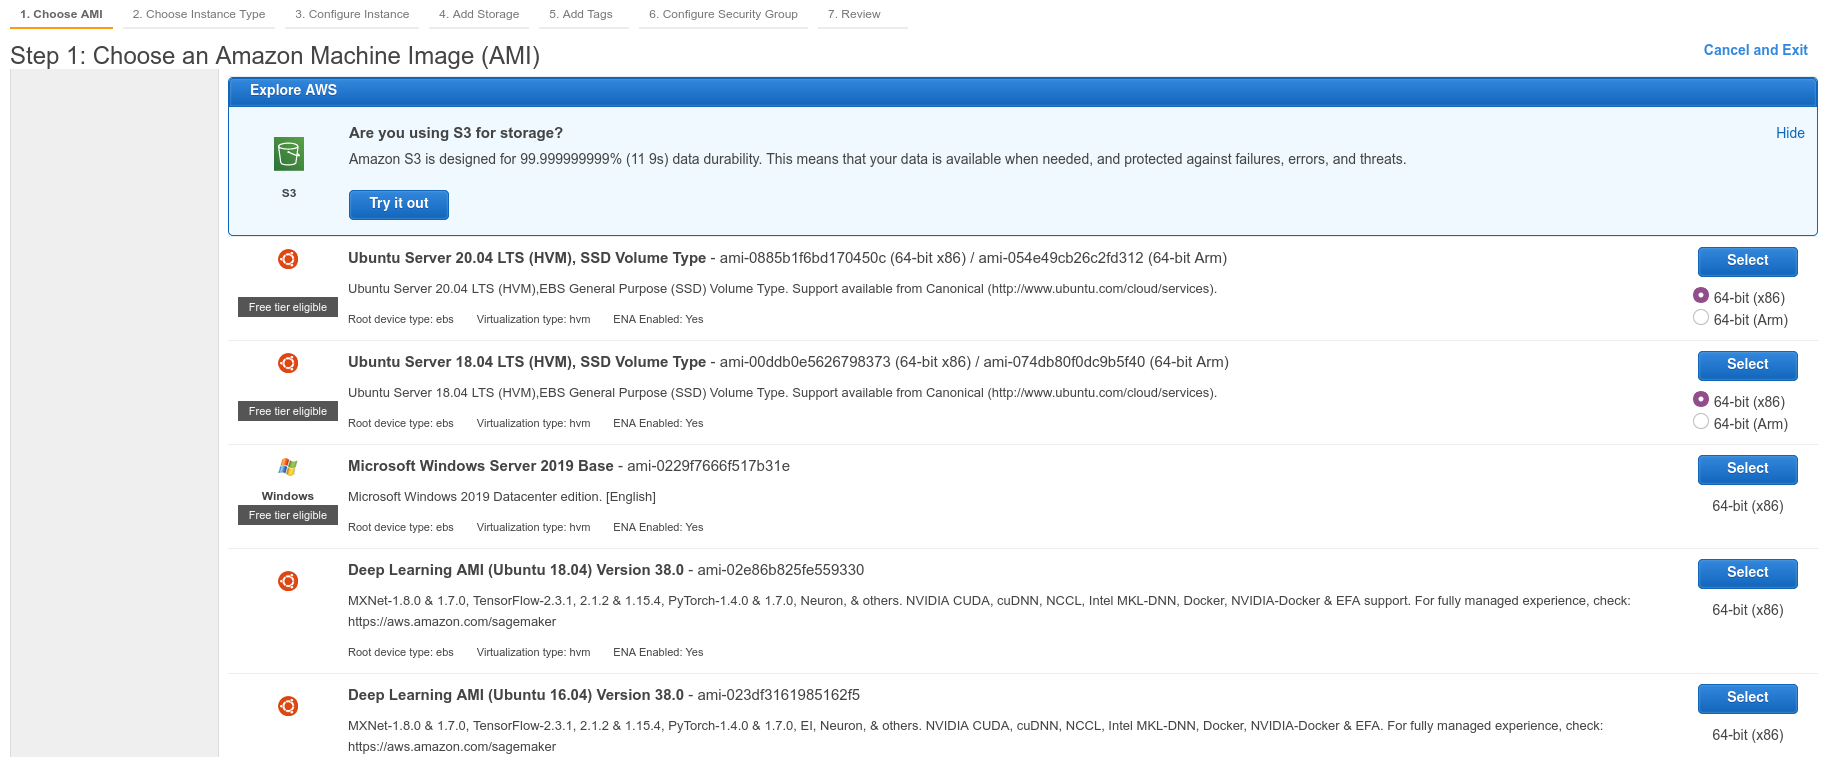
On the next page, leave the instance-size setting at t2.micro (notice that this is a computer with 25% of the memory of
a current iPhone) and click the grey "Configure Instance Details" button. The next page has a lot of settings, but we only need
to change one of them. On the IAM Role dropdown, select the role that you created a minute ago.
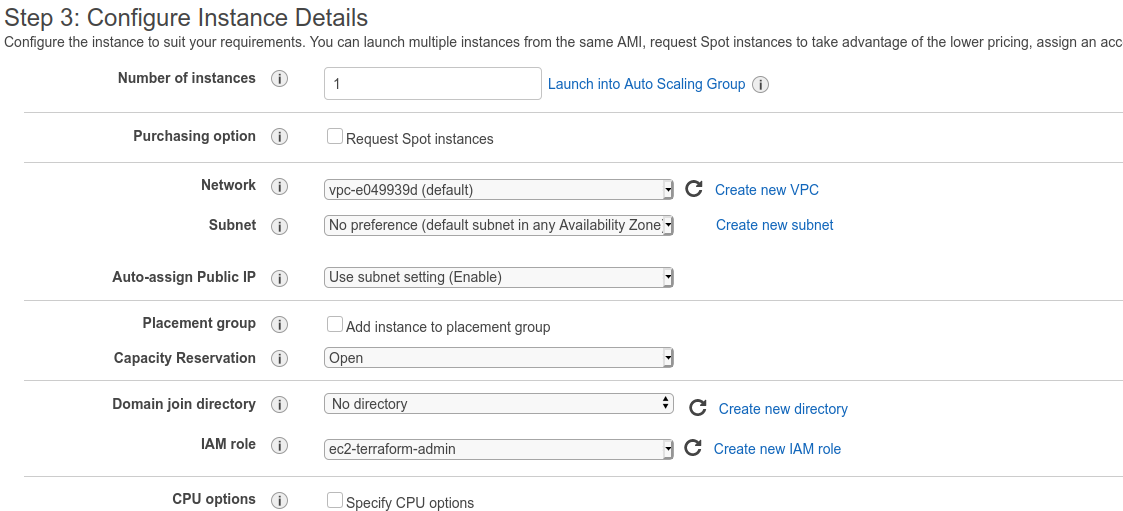
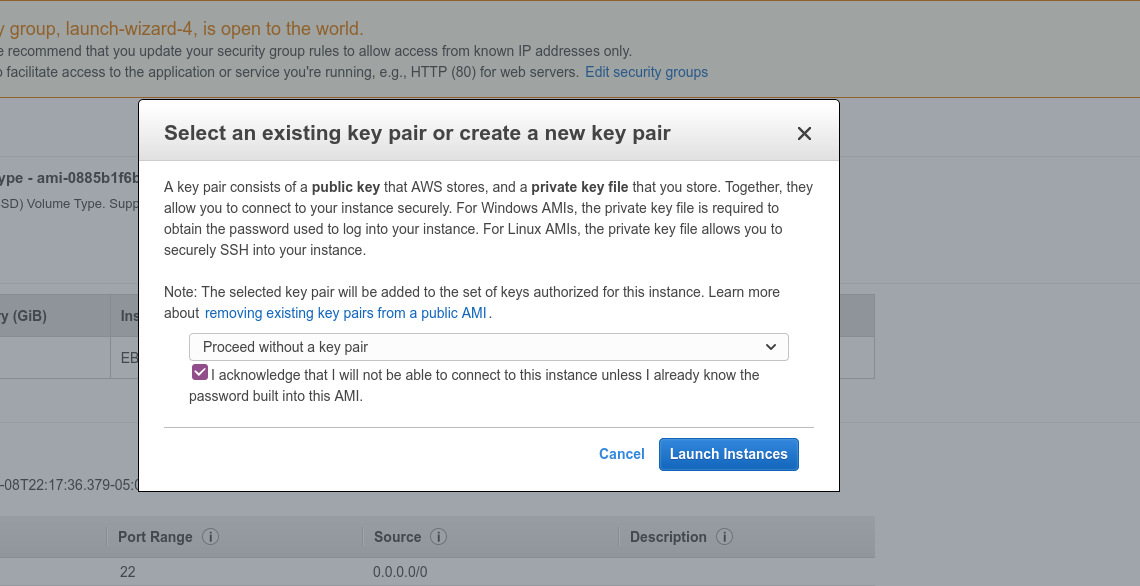
We don't need to change any more settings. Click the blue "Review and Launch" button at the bottom of the screen. On the next page, click Launch. On the popup, choose "Proceed without a a key pair" from the options, click the checkbox, and launch the instance.
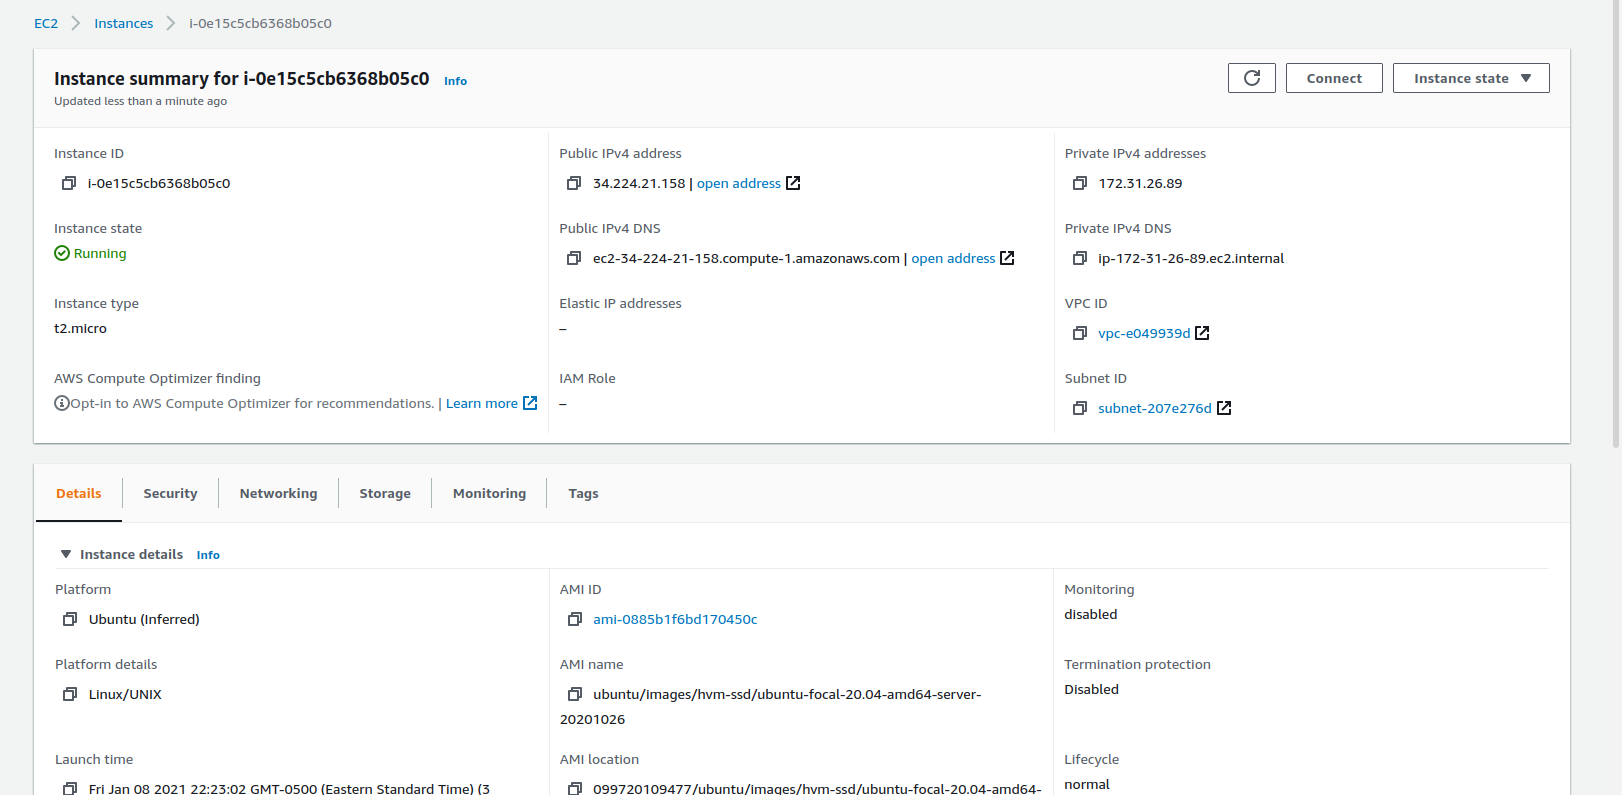
Back on the instances page, you should see that your instance is starting up. Click on its ID, and at the top of the table click "Connect." When the instance is first starting, there's a short time (under a minute) when you can't click "Connect" so if it's disabled at first give it a few seconds.
The next screen presents options for connecting. We're going to use the default of EC2 Instance connect, so just click the orange "Connect" button under the "Connect To Instance" panel. You should see a screen that looks about like this:
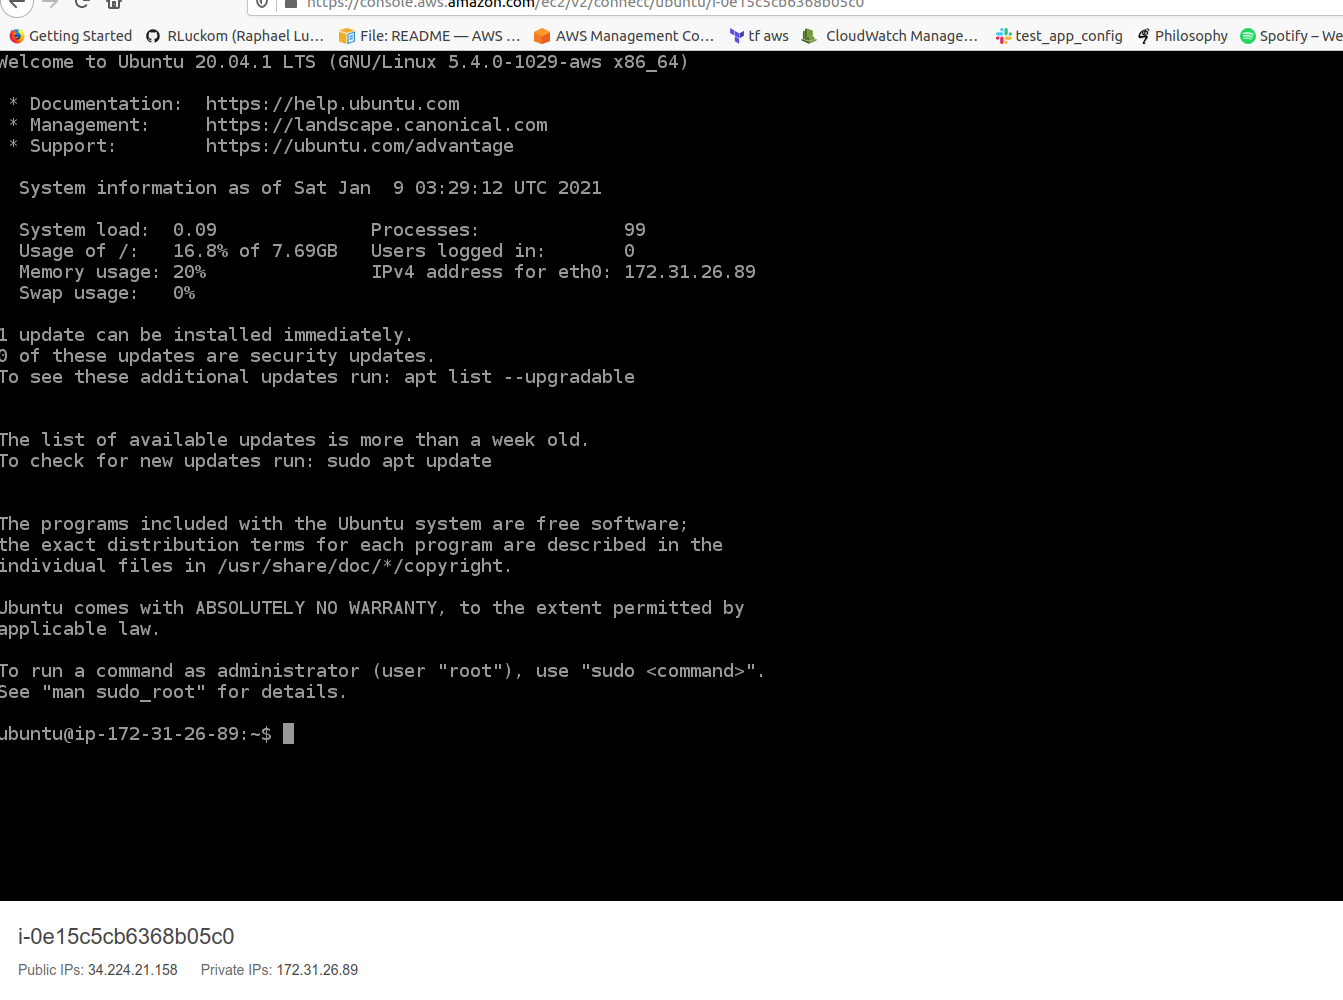
For the next few steps, we're going to be using the command line. The command line is a way of using written language, instead of a UI, to tell a computer what to do. Using the command line, you type instructions (commands) at a command line prompt. A prompt looks like this:
ubuntu@ip-172-31-27-94:~$
This prompt has three parts, separated by @, :, and ending with $. The first part, ubuntu, is the logged-in user.
The second part, ip-172-31-27-94, is the name of the host--since this is an AWS instance, it is simply named for its IP address.
The last part of the prompt--the character ~, is the path, or "what directory you're currently in." The ~ path is special;
it means that you're in the logged in user's home directory. You can see which directory you're in at any time by entering pwd.
Install Tools and Set Terraform State Bucket
Requires:
- AWS Account
- An admin role
- A VM on which we can install terraform.
Results:
- terraform installed
Time: 3-5 minutes
For the next few steps, I'm going to describe the commands you need to run and also provide
screenshots of what the output looks like. I've tried to make sure that I included the full text of each command.
When in doubt, use the screenshots to see exactly what I typed. Also note that the console tends to get
disconnected (The UI will freeze and you'll have to re-login through the "Connect" page on the instance
if it is idle for more than about 5 minutes. If this happens, log back in and repeat any commands starting with
"cd" to get back to the right directory.
Before we can run terraform, we need to install it. Actually, we need to install a few things using a script.
A script is a short program we run at the command line. They often take care of housekeeping tasks like setting up an instance. But scripts can do just about anything, so you shouldn't run any script unless you understand exactly what it does. The script we're going to use is linked above, and it has comments explaining what it does.
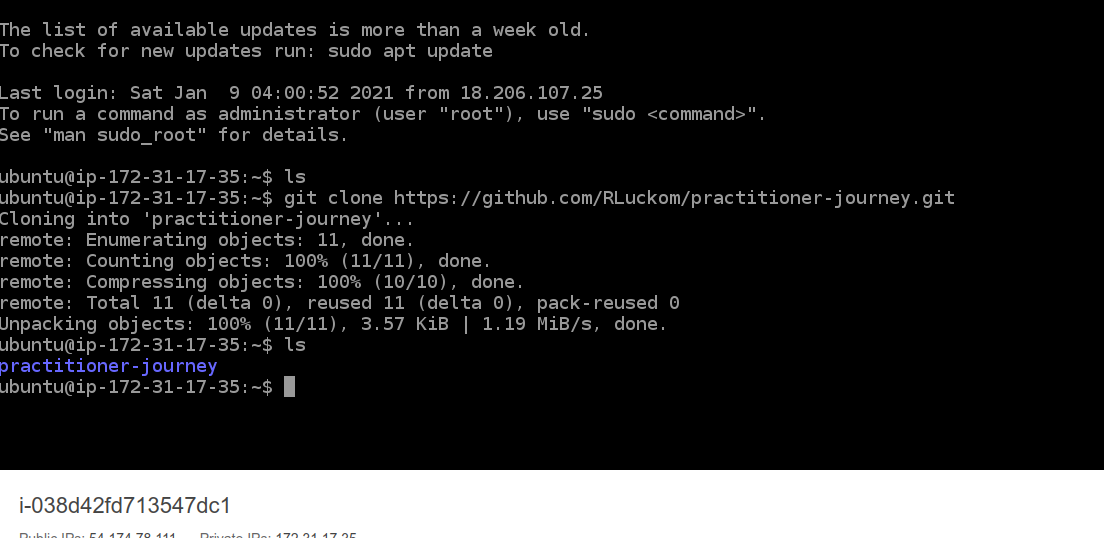
The ls command lists the contents of the current directory. Type ls and press Enter. There will
not be anything in the current directory.
We're going to download the script using git. Copy and paste the following command and enter it:
git clone https://github.com/RLuckom/practitioner-journey.git
Now use ls again to see that the download succeeded (your output will not be exactly the same; the number of objects
at least will be different):
If you ever mistype a command, you can press Ctrl-C to cancel the command you're on without entering it. It's also fine to close the window and log in again through the Instances page.
Now we're going to use cd to change directory into the directory the script is in. Enter the instruction:
cd practitioner-journey/000/
Use ls to see what's in the directory. You should see a green file called setup.sh. This script requires elevated
permissions, so we're going to run it as the super user. The last step in the script asks you to enter the name of the
S3 bucket you made for the terraform state. Type in the bucket name and press Return.
sudo ./setup.sh
If you make a mistake entering the bucket, you can run the script again the same way and enter the right name.
Run Terraform and Create Static Site
Now we're going to run terraform to build the site. Notice that throughout this process, we've used the cd and ls
commands to orient ourselves within the system, moving around and looking for files.
Requires:
- AWS Account
- A VM
- An admin role
- terraform installed on the VM
Results:
- An S3 bucket configured as a static site.
Time: 3-5 minutes
Now run "cd terraform" to move into the "terraform" directory.
Run "terraform init" to set up terraform.

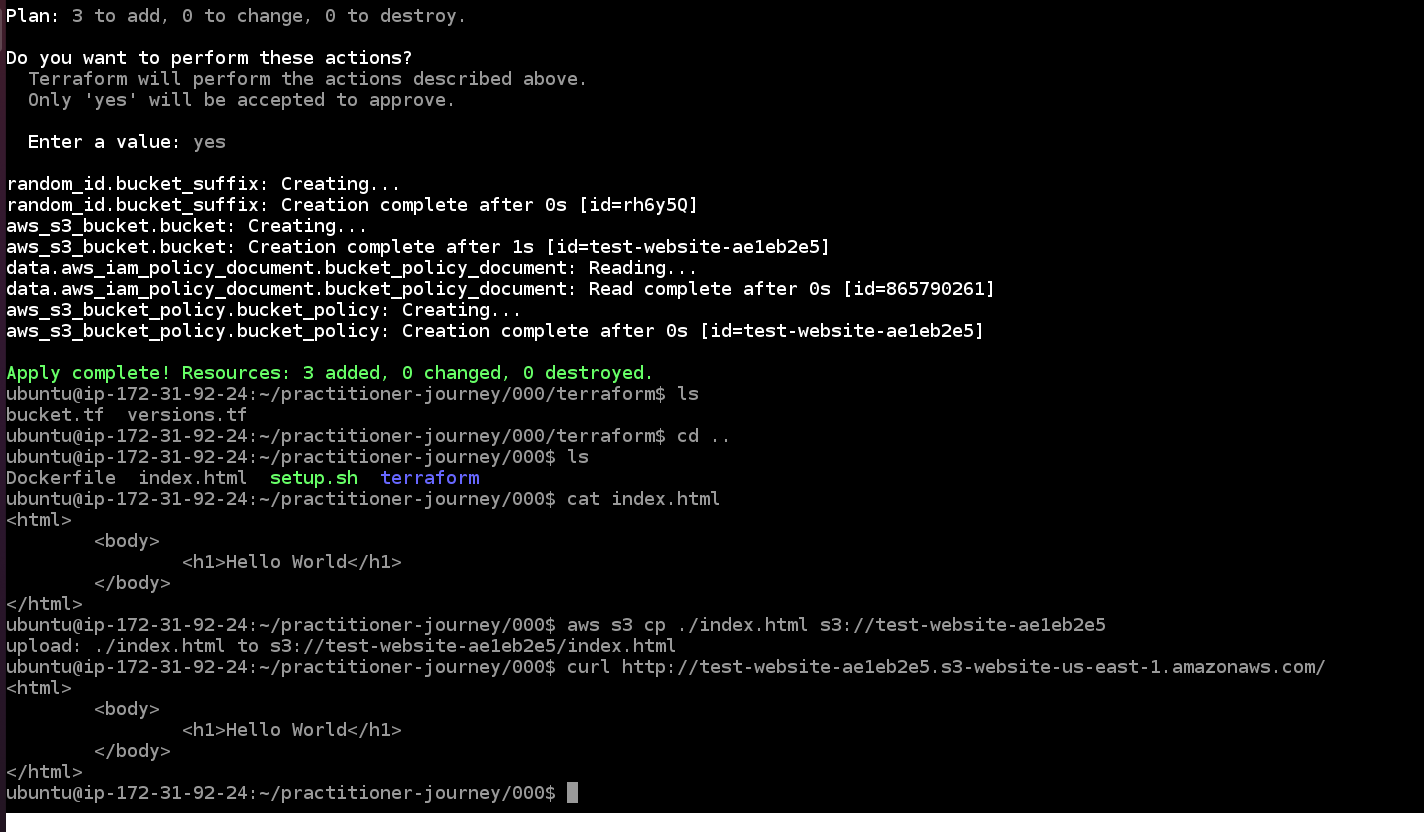
Next, run "terraform apply". In this step, terraform is going to create the infrastructure. You will see a plan that creates
3 resources, modifies 0, and deletes 0. Type "yes" at the prompt to accept, and press Enter. The output should look like the following:

Enter yes to create the infrastructure.
Upload an index.html page and look at the website
Now we're going to upload a minimal webpage to the bucket. AWS provides a command-line-interface (CLI) for interacting with S3. We're going to use that to copy an index.html file from our instance to the S3 bucket[7].
Requires:
- AWS Account
- S3 Bucket configured as a static site.
Results:
- An S3 bucket configured as a static site.
Look at the s3 console to find the name of the new bucket (yours will have a different random string at the end than mine)
Run "cd .." to move into the parent of the current directory. The special path .. is used when you want to go "up a level" in the
directory hierarchy--when you want to move from the present working directory (pwd) into the parent directory.
Then, run "aws s3 cp ./index.html s3://{your-bucket-name}" (replacing "{your-bucket-name}" with the actual name of your bucket).
This uploads the index.html file to the bucket (the curl command in the following is unnecessary):
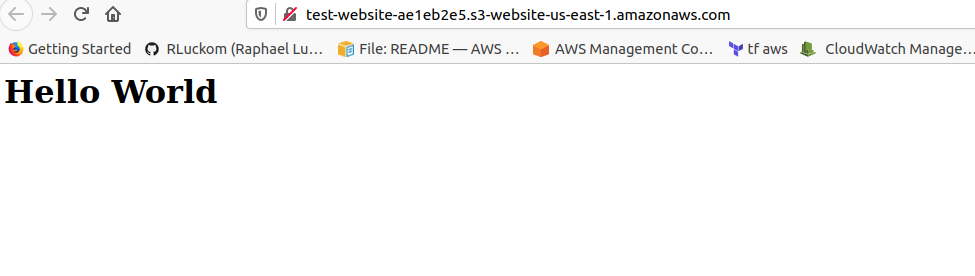
Go to the s3 console and click on the website bucket. On the bucket page, go to the Properties panel. Scroll all the way to the bottom to find the bucket's website configuration:
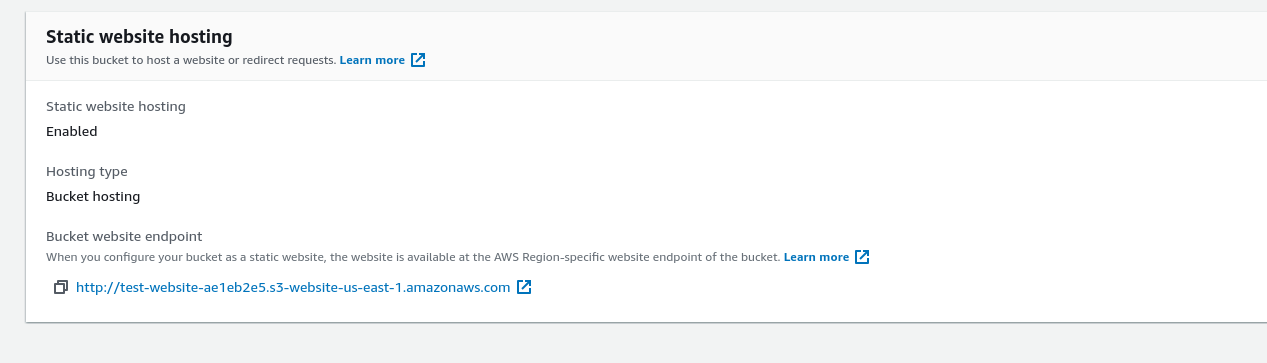
Click the link in the bucket configuration to see the hosted page:
Delete Everything
Now that we've finished the exercise, we need to clean up. If you continue on this practitioner journey, you'll find that these little experimental pieces of infrastructure can stick around for ages.
First, we need to delete the index.html file that we added to the bucket. At the command line,
enter "aws s3 rm s3://{your-bucket-name}/index.html" (replacing "{your-bucket-name}" with the actual name of your bucket). This
will delete the index.html file from the bucket. In the next step, we're going to run terraform destroy to delete the bucket,
and if we hadn't deleted the index.html file first, terraform would refuse to delete the non-empty bucket.
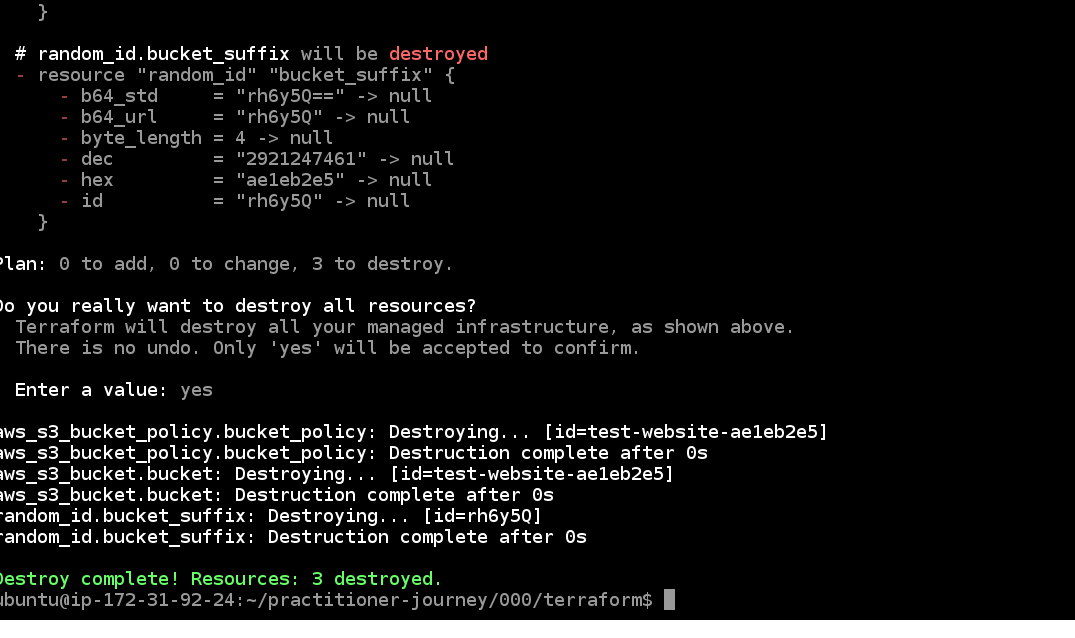
Now enter "cd terraform" to move into the terraform directory. Enter "terraform destroy" to clean up, and enter "yes" at the
confirmation prompt.
This was the last thing we needed this VM for. Terminate the instance using the Instance State dropdown on the instances list.

All done! You've successfully deployed, managed, and cleaned up a piece of cloud infrastructure!
Conclusion
If you've gotten this far, you've done every step that will be required to deploy any of the things I'm building. In the future, as I make improvements to my site, I'll also release them here as exercises for you to install and play with. When I wrote a post on how to get into programming, I identified one of the crucial steps as establishing a development cycle--a repeatable way to try out an idea, evaluate how it worked, and adjust accordingly. This post presents some of the core parts of a cloud development cycle. In future posts, we'll look at how to plan out systems like this and express them in terraform.
In the next exercise, we'll use terraform to deploy a series of billing alarms that notify us if our bill goes above $5 or $10 in a month, because that would obviously be crazy.
As I said in a previous post, not everyone wants to be a practitioner. That's ok, but this practitioner journey series is specifically for those who do. That means we're going to spend time on details and deep comprehension, rather than prioritizing quick wins. ↩︎
I have to acknowledge mixed feelings about this, but I honestly think it's the best way. Amazon has a history of abusive behavior that I won't minimize. It's also the largest cloud services provider in the US. What this means in practice is that you are using it. Netflix is hosted on AWS. As are Twitter, Facebook, LinkedIn, Spotify, Twitch, Zillow, Disney, AirBnB, ESPN, and many others. Each of these services monetizes you, and passes through some of their revenue to Amazon. Each of them, in turn, is running a whole array of services. Some of those services, like the ones Netflix uses to deliver streaming video, are what I would call straightforward--their purpose is to do the thing that you, as a customer, want them to do, more or less. Other services, like facebook's tracking, advertising, and analytics systems, are what I would call abusive--their primary purpose is to take advantage of their users. If you were to run your own services, you would want to replicate the straightforward ones--there's nothing especially nefarious about the nuts and bolts of delivering streaming video--but you would never want to replicate the abusive services. In this sense, using AWS directly is likely to reduce the amount of your business that AWS gets overall, since it will help you reduce your reliance on middle-people who pay AWS to run those abusive services.
The other dimension to consider is the environmental impact of computing. Here we have a rare example of environmental incentives aligned with capitalist incentives--AWS and the other big cloud providers make serious efforts to reduce both their energy expenditure and their carbon footprints. Their scale allows them to take advantage of efficiencies that smaller players never could. I'm not exaggerating at all when I say that if the US had a National Public Computing Infrastructure, I'd want it to work, from a customer perspective, exactly like AWS.
The last point to make has to do with scale. As regular humans, our uses for computing are very small-scale. In general, we want to talk to our friends and post selfies that make it look like we're not living in the end times. Ironically, the largest cloud providers are the most efficient at offering the smallest services. As I discussed in a previous post, the most cost-effective model for this scale is a pay-as-you-go approach, where instead of renting servers that are always on (and always drawing power), you instead use services that only run when they're needed--websites that only use computing resources when people are actually using them. These types of services are cheaper and more environmentally friendly than many alternatives. They also support scaling better--if something that you post goes viral, the components that we'll be using will handle the additional load smoothly.
On balance, I think these are three factors that make it better to use AWS directly for my own infrastructure than not:
- By reducing my availability to abusive systems, I reduce the total amount of computing that is done on my behalf, and I avoid contributing, via monetized attention, to dysfunctional social feedback loops. Instead, I'm putting my attention to the creative exploration of genuine and meaningful social expression.
- By using a large cloud provider, the comnputing done on my behalf contributes the smallest possible carbon footprint.
- By using on-demand services, I ensure that my services don't consume resources except when they're being used, and that they can scale smoothly and without fuss.
As I said, I have mixed feelings about this. My strong preference, if I thought the US government was capable of adulting, would be for an AWS-style cloud to be created as a public service--essentially the same cloud, but with public oversight and accountability. Sadly, I have no confidence in the ability of the US government to run such a service. For me, for now, AWS seems the least-bad option.
There are also social reasons to prefer AWS:
- AWS lets you start a server and interact with it in a browser. This means that those who don't own their own computers can also use these instructions and learn. It also means that these instructions don't have to account for differences in operating systems.
- As I said before, most software jobs these days require cloud skills, and most of those use AWS. I want people who follow these posts to come away with real, commercially-applicable skills. From my perspective as a practitioner, this is the good stuff--the honest-to-goodness highest quality, most powerful and flexible tooling I've found.
When you sign up for an AWS account, you let AWS bill you monthly for the services you use. As of this writing, they also set a $1 hold on your credit card to verify it (but they don't withdraw anything). If you complete this exercise as written, using a new AWS account, all of your use should fall within the one-year free tier, meaning that you should not be charged. If you do not qualify for the free tier, completing this exercise will likely cost under $0.10 (assuming max 2 hours running a server at $0.023 / hour, less than 100MB stored in S3 at $0.023 / GB, and very little data transfer). You can view your month-to-date billing balance (after you set up an account) on the billing dashboard. ↩︎
The two other options are encryption and object locking. Object locking lets you prevent objects from being deleted, but we get most of the benefits from versioning. There's also an option to enable encryption of your objects on disk. It's up to you if you want this; note that it doesn't protect against access through the AWS APIs. If you use encryption, it will be provided through AWS Key Management Service, which charges $0.03 per 10,000 requests. Of the encryption options, "AWS Key Management Service key (SSE-KMS)" uses KMS directly, meaning that every time you access an object you also incur a KMS request. The other encryption option, "Amazon S3 key (SSE-S3)", holds its key outside of KMS, so in theory it doesn't use a KMS request for each object access, making it slightly cheaper. This is an AWS-authored description of the encryption options. ↩︎
Virtual machines are regular computers that you log in to remotely. They are called "virtual" because of the way that they are hosted. They are also referred to as "instances." The AWS service for running VMs is EC2. ↩︎
If you get tired of setting up a new VM every time, you can also simply shut down the VM when you're not using it. Storing a small, shut-down VM is slightly more expensive than destroying it completely. At the time of writing, if you follow the instructions in this post but shut down your instance instead of terminating it, it would cost $0.80 / month. ↩︎
From here on, the bucket is a static site. What that means is that any files you add to the bucket will be available to anyone over the internet. Some people find that this is all they want. Another philosophy, summarized as "manual until it hurts," suggests that once you reach a point like this, where you have a capability (static website) but the process to update it seems hard (write HTML and put it in the bucket), you should let yourself use it for a while before trying to improve it. The intuition used by this method is that we're not very good at anticipating which things we'll care about in advance, and that our understanding of a system improves with use. ↩︎